
We planned to boondock on our new batteries, but we didn’t plan to spend our boondocking time without a generator. After moving from our camping spot at the North Fork Campground, we moved to our new boondocking spot. Our generator quit working on the first day; we didn’t have it to recharge our new batteries or run the air conditioning.
On the first day of boondocking in the Sawtooth Mountains, our generator died. Our generator wouldn’t start after three rain-soaked nights of off-grid camping north of Ketchum. We discovered the problem after we arrived at our boondocking spot. We weren’t optimistic about how long we could stay.

While at the North Fork Campground, our generator was indispensable, especially when our furnace failed. As for the new batteries, the generator also charged them while we heated our RV with its electricity. Once I fixed the furnace, we stopped using the generator for heating, and our new batteries slowly drained, getting nothing meaningful from the solar.
We were deep enough in the trees at the North Fork Campground that sunshine for our solar was not reasonable, especially since it was rainy. When exiting the North Fork Campground, perhaps if we’d known the generator wouldn’t be an option, we would have chosen the easier route and stayed at an RV Park after leaving the campground.

My generator wouldn’t start.
We didn’t know our generator wouldn’t start, and we would be boondocking on solar only until after we arrived at our boondocking site. If we’d had any indication our generator wouldn’t work, we would have made a couple different decisions about our campsite. We chose a site that wasn’t ideal for solar but would be shaded for much of the day. If we parked in the direct sun, we would need air conditioning. Shade keeps the RV cooler but isn’t good for charging our new batteries with our solar panels.

After three days in the rain, we started our week-long boondocking adventure with our new batteries already half depleted. As for our generator being dead, that may be a little bit of an overstatement. The best description is that our generator failed to start. As a result, we have 500 pounds of extra weight up front in our RV.
As a result, we couldn’t use our generator to recharge our new batteries. Our generator was our backup plan; relying on our solar array without a generator backup wasn’t a good plan. In this article, I will explain how we made all our own electricity using only our solar array. Here is a link to our post about our boondocking adventure. Awesome Boondocking Adventure in the Sawtooths

The good thing about shade
Maybe it was a mistake to choose a site with a mountain blocking the morning sun. Sunshine didn’t hit our RV until after ten in the morning. The shade between two trees kept us cooler than a site in the direct sun. Of course, the trees just south of the RV cast a shadow across the solar panels, limiting our ability to recharge our new batteries. The most important period for charging our new batteries is between 10 am and 2 pm. Before 10 am and after 2 pm, the indirect sunlight helps, but most of a daily charge happens in the four hours centered on noon.

The shade kept us cooler than we would have been if the RV had been sitting in direct sun. Since I fixed our furnace only two days before moving to our boondocking site, we could use it, rather than sunlight through the front window, to warm the RV each morning. It was cold every morning when we were boondocking in the Sawtooth Mountains. This article also details how I fixed the furnace after it screeched to a stop. Winter started at the end of June.
The bad thing about shade
The bad thing about shade is that my solar array couldn’t keep up with our electricity use over the week, and our battery state of charge gradually dropped until we worried the new batteries would dip into a severely discharged state. We were one cloudy day away from leaving our boondocking site because we ran out of power. We had clouds every day while we were boondocking in the Sawtooth Mountains.

After seven days, we left our boondocking site not because we were out of water or electricity, but because we needed to go somewhere to get our generator fixed. What isn’t obvious, and a reason I didn’t have to worry about severely depleted batteries, is that we have two separate battery banks. One creates Alternating Current (AC), and the other is dedicated to Direct Current (DC). The AC battery bank can charge the DC battery but not the other way around. We installed our new batteries in the AC battery bank.
About our new batteries
Our new batteries are Lithium Iron Phosphate (LiFePO₄ or LFP), not nickel manganese cobalt (NMC). Both are lithium-ion batteries, but they are not the same. Lithium Iron Phosphate batteries are safer to use and store and will last about five times longer than nickel manganese cobalt batteries. The only advantage NMC batteries might have is smaller size.
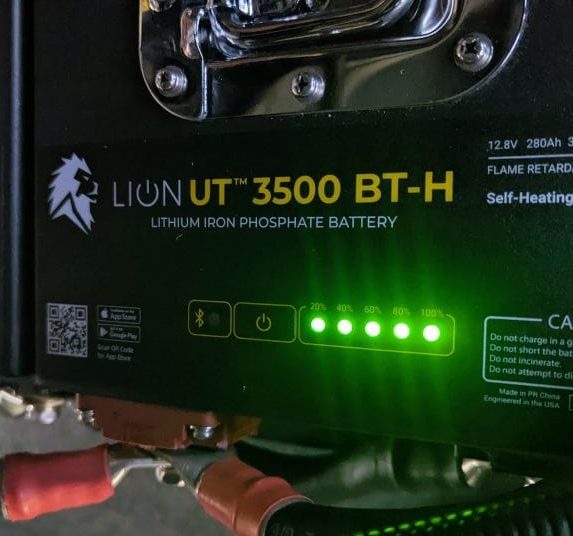
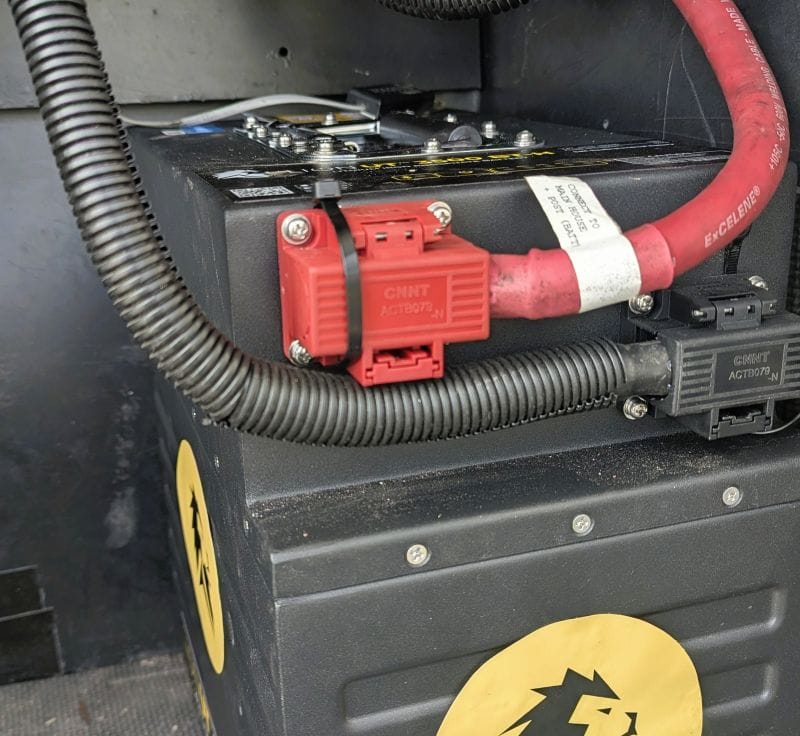
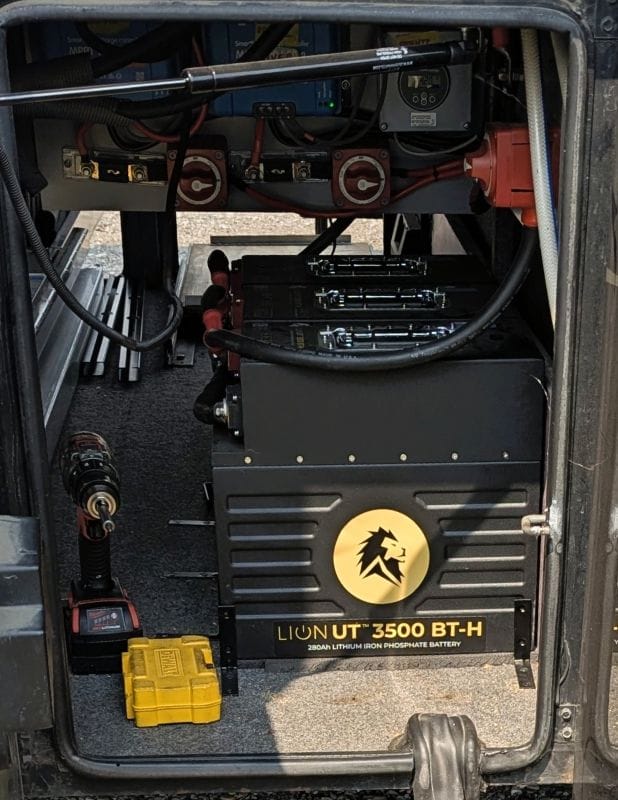
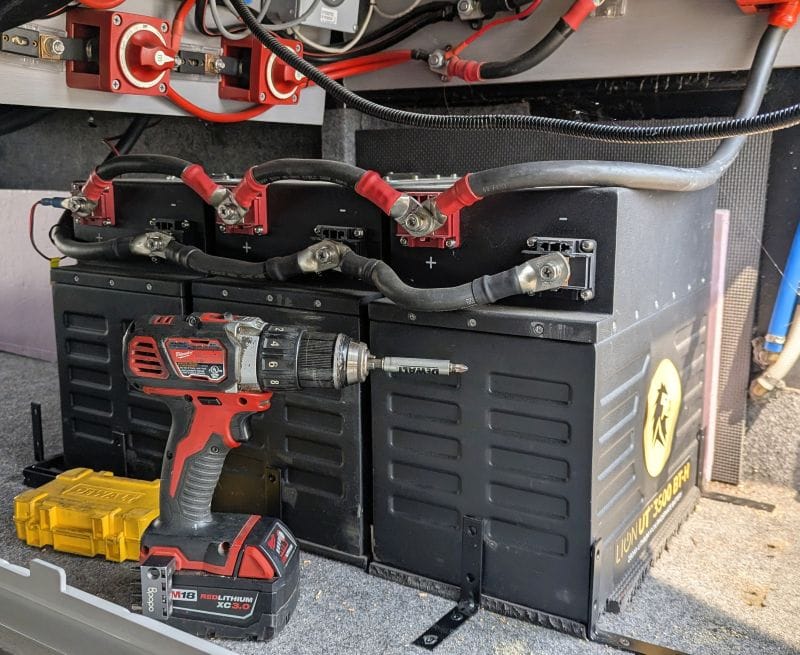
This spring we remodeled our battery bank, and I now have new batteries with three Lion Energy UT 3500 batteries that combined have 840 amp-hours of storage, plus one six-year-old Lion Energy UT1300 that has 105 amp-hours of storage (when new). In the future, I will add an additional Lion Energy UT3500 battery to the setup so that I could, if needed, convert to a 48-volt inverter when our current inverter finally quits. Because a single Lion Energy UT3500 is nearly equal to three of my previous batteries. I only need one additional UT3500 battery to convert to a 48-volt system.
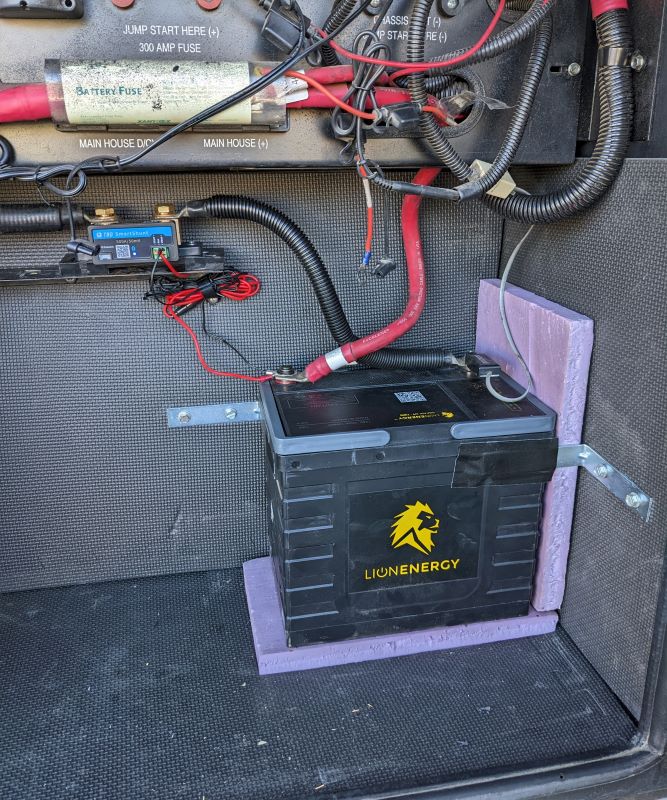
When my battery upgrade is finished, my main battery bank will have 1120 amp hours of storage. For those who prefer watt-hours (more accurate), the main battery bank will have about 14,000 watt-hours. Plus, our six-year-old Lion Energy UT1300 battery is doing backup duties.
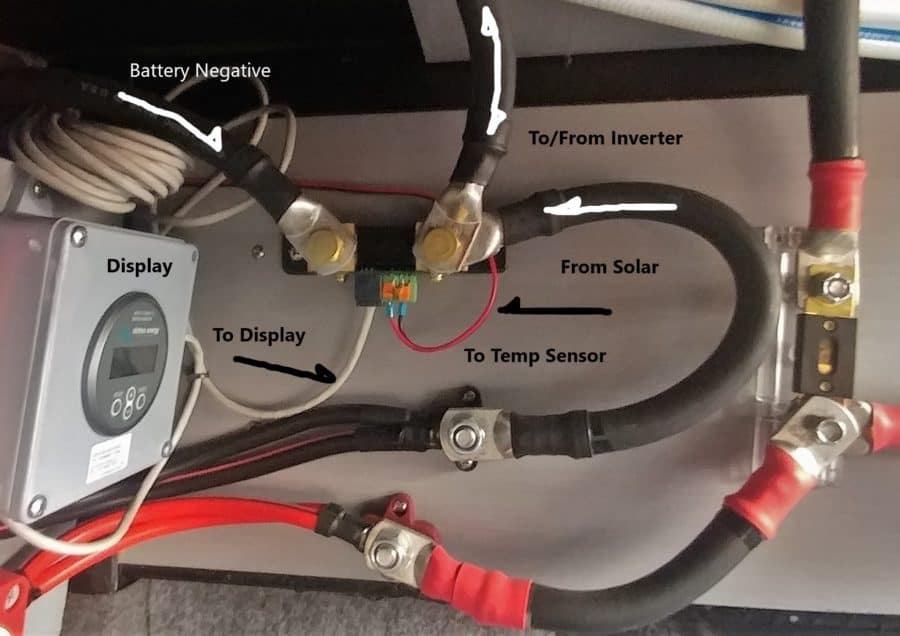
I still use the split system where my Lion Energy UT3500 batteries are my main battery bank and my six-year-old Lion Energy UT1300 is my backup battery. To understand how this system is set up, I wrote this article when I changed the setup to make the Lion Energy UT1300 a backup battery and gave all my sealed lead-acid batteries to a friend. Can one lithium battery replace four lead-acid batteries?
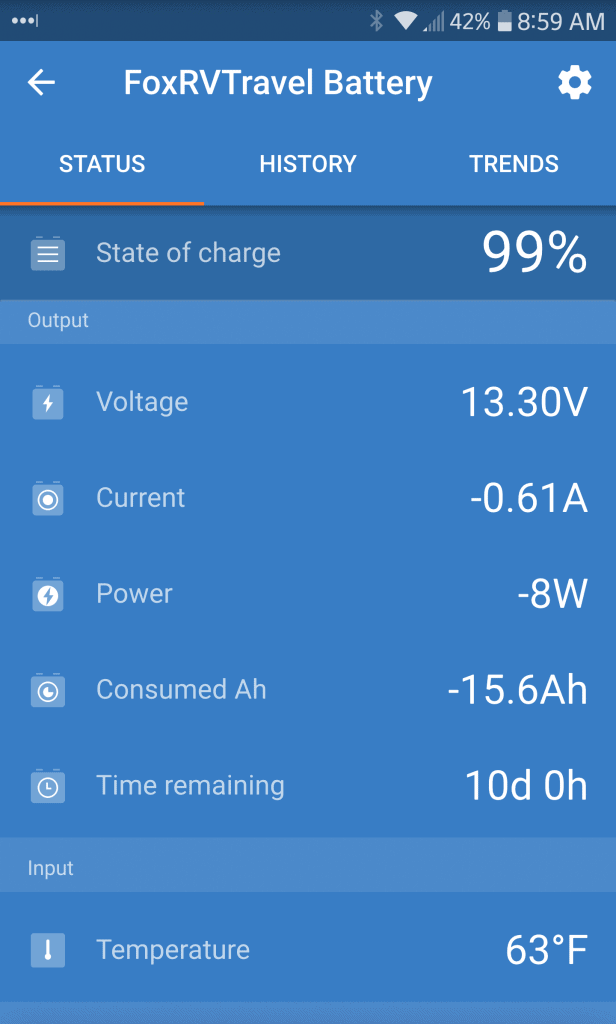

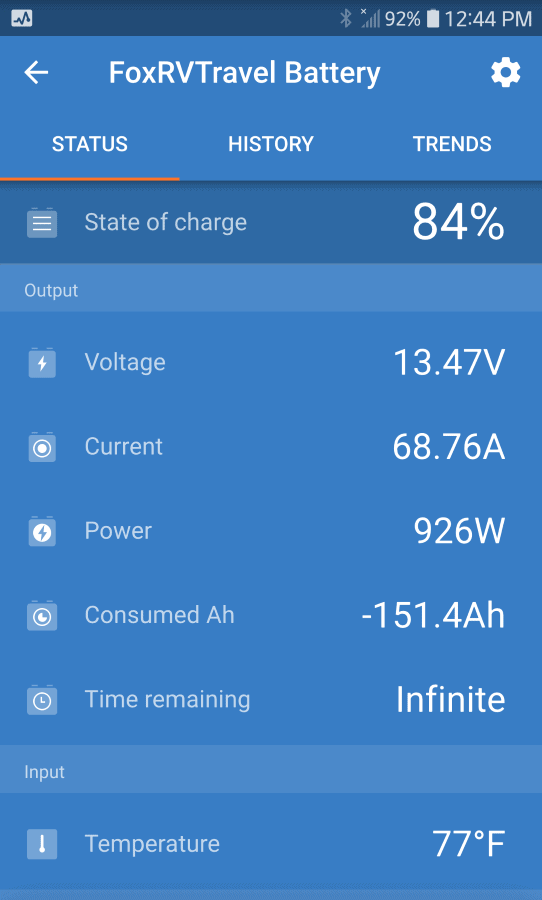
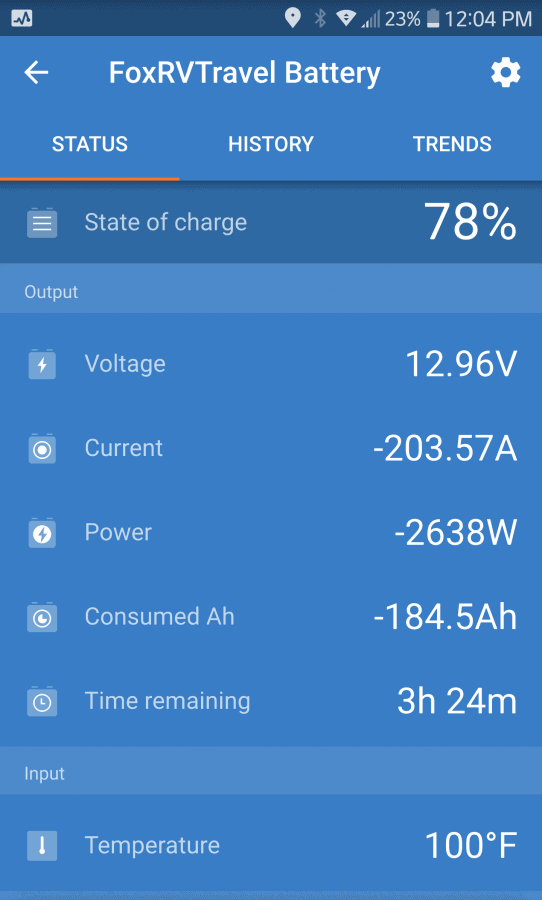
The key difference between these two images is that the screenshot on the left shows discharging, and the one on the right shows charging. While charging, the voltage is only slightly higher than when discharging. This, along with other factors associated with lithium batteries, shows that voltage doesn’t tell the whole story. The battery bank on the right-hand screenshot is depleted.
How to treat lithium batteries
For the last six years, I have lived happily knowing my battery setup was a success. I also know that my new battery setup is a success. The number one thing you can do with a lithium battery setup is monitor its use carefully. Don’t ask for more than they can deliver comfortably. How do I know how to treat my new batteries gently… I have an article about that. The RV battery monitor is the most important part
Heat is a problem
Correct charge and discharge rates keep input and output within what the battery can handle, so it stays cool and doesn’t overheat. All batteries release heat both while charging and discharging. If you charge or discharge rapidly, then extra heat builds up quickly. If you discharge rapidly and then immediately recharge rapidly without letting the heat dissipate, it will hurt the batteries. Extra heat is bad for batteries. I want to keep my new batteries in like-new condition.
Cold is a problem
Cold can also be a problem. Ideally, the best temperature for your lithium batteries is about 65 degrees (18 degrees Celsius). I monitor my batteries very closely to make sure they never get cold. Nearly all lithium batteries have an automatic charging disconnect if the temperature drops low enough. You can’t recharge your batteries when they are below freezing. Here is our article about killing batteries. Destructive Lithium testing.

The key thing about a clamp meter is that you place it around a single wire. If it is a DC wire, you need a DC clamp meter with a Hall Effect sensor to read DC amperage. A clamp meter reads the magnetic field around the wire as voltage flows through it. In this photo, I am not using this clamp meter correctly; the sense lines are indicated by a raised area on the clamp. To get an accurate reading, place the wire next to the active part of the clamp.
Size can be an issue
It isn’t a question of how big the battery is, but rather how big the battery bank is. A bigger battery bank discharges more slowly (compared to a single battery) and recharges more slowly than a smaller battery bank. Six years ago, I sized my battery bank to go for more than 24 hours without a recharge. Instead of guessing, I tested my setup for six months to figure out how large I wanted the battery bank to be before I purchased my batteries, and another six months before I decided how big a solar array I wanted. Here is a link to an article about that subject. RV Boondocking Without Solar
What is special about my new batteries?
My new batteries have built-in heaters. Unlike my previous batteries. My new batteries not only have low-temperature charging protection, but they also route incoming power to internal heaters to warm the batteries to charging temperature. You never want to charge batteries when they are cold. Remember the article about testing lithium batteries to kill them. That was the subject. Here is another link to that article. Destructive Lithium testing.
Metal case
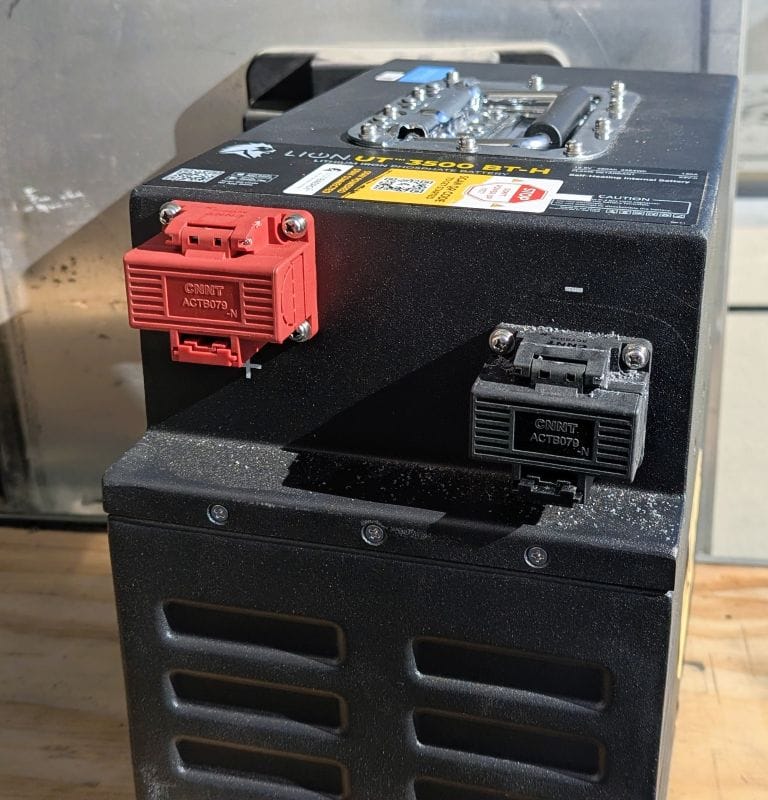
I really like the Lion Energy UT3500 metal battery case for a few reasons. Most obviously, a metal case is strong. The metal case also allows for rapid heat transfer to the outside of the battery. Heat dissipation is important for both charging and discharging. The metal case helps keep temperatures lower during use. Second, if one of the battery’s heaters is activated, the metal case helps transfer heat to the other batteries to keep them warm. Since my new batteries are located right next to each other, the entire battery bank will benefit from the heat.
Batteries with Bluetooth
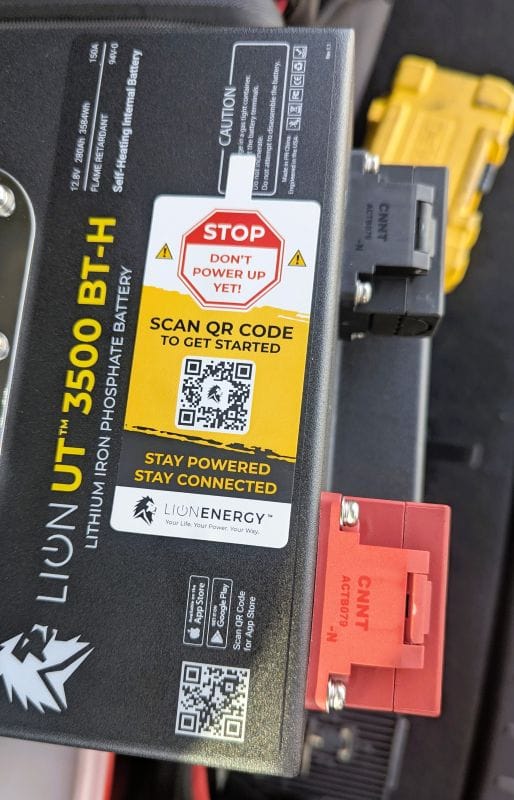
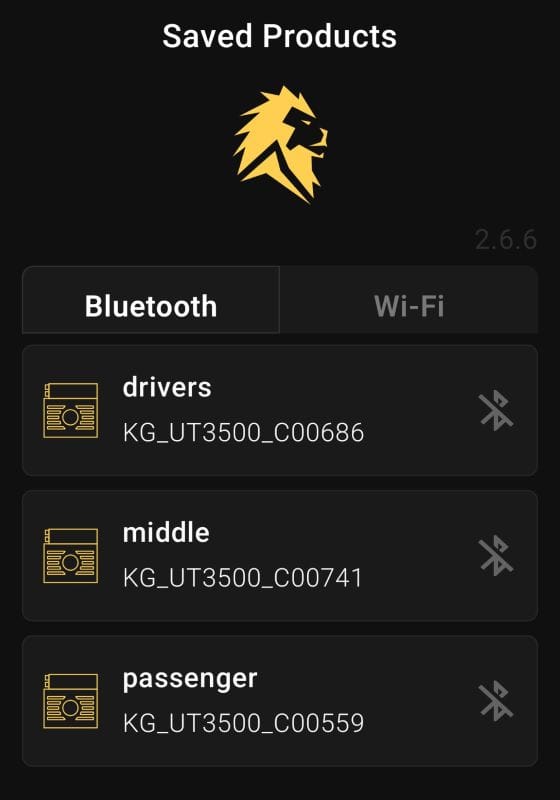
My new batteries have Bluetooth and WiFi connections. We can monitor our new Lion Energy UT3500 battery status, including state of charge, via Bluetooth directly from our phone. I am very impressed with this capability, and it’s especially important if your RV doesn’t have a shunt-based battery monitor. I love having both Bluetooth in the battery and a shunt battery monitor. I am almost ready to say that if you have a Lion Energy UT3500 battery with Bluetooth, you might not need a shunt. In 2021, I wrote this article about monitoring my batteries. The RV battery monitor is the most important part
Since my new batteries have Bluetooth, are they networked so that each battery knows the state of charge of the other batteries in the battery bank? If so, the battery management system could slightly restrict or even pause charging of the high battery to let another battery in the bank increase its charge rate. I have noticed a small difference between one battery being full while the other batteries are almost full.
Low voltage shutdown
My new batteries have a low-voltage shutoff at 10.5 volts. If you discharge a battery too much without this feature, you might kill it, or (sometimes) you might be able to restart it. Even with our new batteries at less than 20% total charge, I didn’t have to worry about going too low because of this feature. Yes, one time I accidentally let my batteries run down all the way to inverter shutdown. Here is a link to that article. Our RV electrical failure led to a surprising discovery.
How to Interpret Battery State of Charge and Solar Charging Data.
How to Interpret Victron Battery State of Charge and Solar Charging Data. I have a large solar array to recharge our new batteries, but the information available on the Bluetooth displays isn’t apparent to everyone.
My RV battery and solar array consist of two Victron MPPT 100/50 charge controllers, 1,800 watts of Zamp Obsidian solar panels, and about 900 amps of lithium iron phosphate batteries. I also have a Victron BMV-712 Battery Monitor. My Victron solar charge controllers also have Bluetooth, so I can monitor the system’s performance. In the background, each component networks with the others for optimal charging. My new batteries and Victron components all have Bluetooth so I can monitor them.
Bluetooth
My new batteries’ Bluetooth data is sufficient to monitor my system thoroughly. Victron has created newer and more expensive equipment that I don’t have, but since my current system is sufficient, I don’t think I need it. I could invest more money and time in newer gear, but I don’t believe it is necessary. Now that I have a Bluetooth connection directly from my new batteries, I’m sure that I don’t need the new Victron equipment.
On my Victron BMV 712, I can also see on my inverter display how my inverter is working. When hooked up to shore power, I can also tell how my charger is working, all from the Victron app on my phone. This information was critical because it showed that while I was recharging, the charger part of my inverter wasn’t working correctly.

Lots of numbers
The key point to remember about Bluetooth information is that positive numbers are good. In terms of banking, positive numbers are deposits and negative numbers are withdrawals.
The most critical information is delivered to me with my Victron Battery Monitor. If your RV battery lacks a battery monitor, you’re left guessing (even with a voltmeter) about its state of charge. I think the Victron Battery Monitor is so important to my system that I wrote an article about it. Here is a link. The RV battery monitor
Interpreting Battery Monitor data
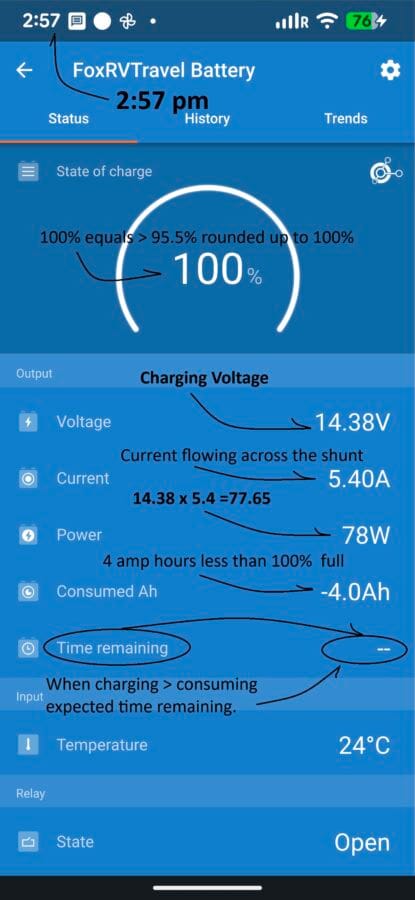
Breakdown of the Battery Monitor data
~State of Charge
The battery state of charge is the most critical number. If you have lead-acid batteries, you need to recharge them to 100% each day. If you don’t get lead-acid batteries back to 100%, you will reduce their lifespan. Recharging lithium batteries to 100% daily isn’t crucial for battery health.
~Battery Voltage
Battery voltage matters, but less than state of charge. A battery voltage between 12.7 and 12.9 is a fully recharged lead-acid battery. When charging, this number is the charging voltage, not the resting voltage. Expect to see higher numbers here than resting voltage when charging from any source.
~Current
Current measures how many amps are flowing into or out of the battery. In this graphic, since the number is positive, current is flowing into the battery at 5.4 amps.
~Power
Power measures the wattage going into or out of the battery. In this graphic, the wattage is 78. Multiply the wattage by the voltage to get the current.
~Consumed Ah
This number is the true state of discharge as compared to a full battery. In the above graphic, Consumed Ah is -4 Ah, indicating the battery is not completely full. Given the current is 5.4 amps and not being used for anything else, I would expect a full charge anytime.
~Time remaining
When charging, it would be nice to see time to full rather than just a dash. When discharging, time remaining is good enough.
Interpreting Victron Solar controller data
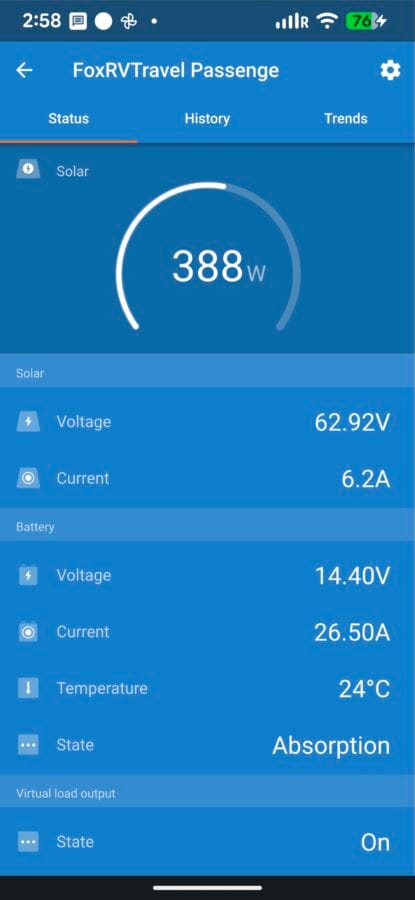
Breakdown of the Solar Controller data
This controller is hooked to the passenger-side array on my RV. I have a second controller for the panels on the driver’s side of my RV. The names relate to how I wired the panels.
~Solar Wattage
The largest number on the solar controller data screen is the wattage on the solar array associated with this controller. On this graphic, the wattage is 388 watts.
~Solar voltage and current
The voltage coming from the solar panels is 62.92 volts, and the current is 6.2 amps. This next section breaks down what the controller is actually doing to the battery bank.
~Battery
The Battery section describes the controller’s output to the battery.
~Voltage
The voltage converts the solar array voltage from the previous section to the correct battery voltage. 14.4 volts is the ideal charge voltage for my batteries. 14.4 is not the resting voltage of a fully charged battery.
~Current
Current measures the flow into the battery. In this graphic, this controller is charging the battery at 26.5 amps per hour. The maximum current that can flow into my battery from each controller is 50 amps. I almost never see 50 amps from my controller.
~Temperature
Temperature is referenced from the controller, not the panels. I usually ignore this number unless it is hot or cold outside.
~State
The controller determines how to charge the batteries. The state refers to the charge stage, which can be bulk, absorption, or float. This state carries over from when the most common battery was lead-acid. Make sure that any controller you buy has a profile to charge Lithium Iron Phosphate batteries.

Network power
As previously mentioned, my two solar controllers communicate with each other and my battery monitor. Each device monitors battery discharge and recharging. The following screen displays combined data from both solar controllers.
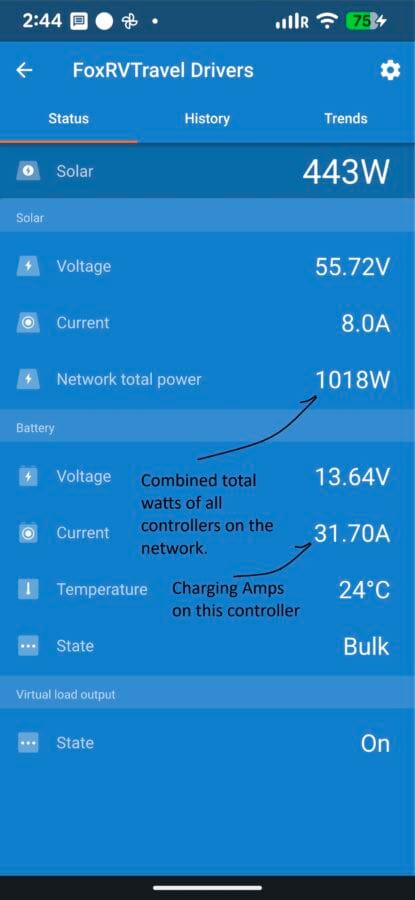
In this case, the controller is receiving 443 watts from the solar array and supplying 31.7 amps of current to the battery. It also monitors the other solar controller and combines its wattage, as represented in the Network Total Power section. The Network Total Power section shows that 1018 watts is charging the batteries. If you take the 443 watts from the Network Total Power, you will see that the other solar controller is producing 575 watts at this time.
A Network Total Power of 1018 watts at 13.64 volts results in 74.63 amps flowing into the batteries.
Since I have two solar controllers and two arrays, my total network power matters, but I wish Victron could provide a clearer picture of what is happening.

Managing expectations
You will never see large current flowing into an already full battery. This doesn’t mean your panels can’t produce power. Rather, it means that the battery is already full.
Combining the information to get a complete picture of what is happening
The following screenshots are from my Lion Energy UT3500 battery. One of the most important reasons is to make sure all the batteries are similar in both charge and discharge. All three batteries should hit 100% at about the same time. The large number in the middle is the battery state of charge. Above that, it clearly mentions the word charging or discharging. If amperage input is higher than consumption, the battery is charging. Each battery also shows its internal temperature (which rises slightly when charging or discharging) and voltage, which is only accurate when discharging.
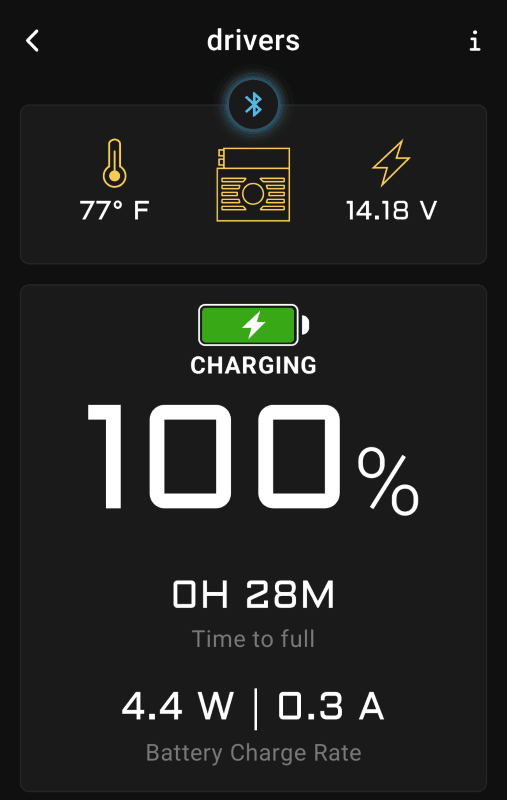
The estimated time remaining assumes the discharge rate stays the same, with no change in amperage. Since I have three new batteries, they should all charge or discharge at about the same rate, and each should have a similar time-to-empty reading when discharging.
How I use this data
Using all this information, plus a little crystal-ball reading about solar and shading, I stretched our Boondocking time to seven days before we ran out of water. Seven days after we arrived at our boondocking site and needed more water and to dump our holding tanks, we crossed Galena Pass to a campground in Stanley. When we left our boondocking site, our batteries were below 20% state of charge. We needed to plug in, or at least get more direct sun on our solar panels.

While boondocking and data gathering, I also learned that the solar array on the driver’s side doesn’t produce as much power as the passenger side. Since we were in the middle of the summer and the sun was nearly straight overhead, this was unexpected. I will learn more about this subject after I make a trip up on the roof of the RV.

The generator still wouldn’t start; I tried it about twenty times over the week leading up to our arrival in Stanley.
Getting our generator repaired
So we drove north to the next town (Salmon) to get the generator repaired. Stanley is beautiful but way too small to get my generator fixed. I will have more to say about all of this in my next post. I wish I had had the resources to stay near Stanley for another week. But I had to get that generator fixed; I had enough water and solar to make it, but time is a resource to manage, too.
Please subscribe and join us on our journey
We will add you to our email list and send you updates once a week. Here is a link. Subscribe
About our links
As you know, our blog income is zero – this allows us to be independent and just tell the truth. We don’t earn income or commissions. No, we don’t make paid endorsements. We don’t make recommendations; instead, we tell you what we like (or dislike). We provide links only as a quick reference to help our readers.
Links
North Fork Campground, Sawtooth Recreation Area
Sawtooth National Recreation Area
Lion Energy UT3500 Lithium Iron Phosphate Battery
About Comments
We love seeing your comments, but they are not automatic. I get about 20 spam comments every day, so I don’t allow automatic comments. I read and personally publish every comment to protect the blog and keep it on topic and real. This means you won’t see your comment right after you hit submit. Sorry for the delay in publishing your comments. We love hearing from you.
Thank goodness for your solar! Happy you were able to continue enjoying!
I’m glad you got it all worked out. Beautiful scenery.
You can’t leave us hanging on the generator! I read that entire article, and I kept thinking 🤔 what about the generator??
Deep dive next post. We threw money at the problem.
Wow to you both! Pioneering Spirits…of sorts! The skill it takes to fix the “covered wagon” is HUGE😉🥴
You explain details so well…a course in RV management and maintenance! I’m sure other RVers learn so much from you.
And thanks for the beautiful scenery pics of our great nation!
Define “boondocking” early in your article. When I look up the definition, it doesn’t include an established campground. Yet the photo shows an estimated campsite with a picnic table. And it would be good to explain, early on, why you made the choice to boondock. Why did your generator fail?
What “luxuries” did you sacrifice to make it through the week? Did it support your household refrigerator? An induction cooktop?
We have a very simple solar system, but our one 1000-watt panel keeps our two old-fashioned, deep-cycle batteries topped off. IF we have sun. We give up our electric kettle, microwave, and a/c. We usually have plenty of power to enjoy plenty of lighting, charge our phones and fan, run our water pump and furnace fan, and run the fridge’s little “brain” on propane.
The picnic table was at the North Fork Campground. The photo before that is our RV parked far away from a campsite at our boondocking spot.
Did we live without anything? No, everything worked: the residential refrigerator, microwave, convection oven, washer, and dryer. We didn’t use the washer and dryer that week, but they would work.
The limit is we could only run one air conditioner, but we didn’t run both because we didn’t need it and because it alone would drain the battery very fast.
The two things we can’t do are heat our water with electricity (we use propane to heat our water) or heat our engine (heating the engine is only important when the weather is below freezing).
Dang, you are a great writer! Very informative.
Thanks for the update. Y’all have had some interesting experiences throughout your travels & survived adversity. You might think you’re losing some of the battles, but you are definitely winning the war. Keep up the fantastic trip through life ❤️🤗
Pingback: Then our generator failed. - FoxRVTravel
Pingback: Our new BLUETTI Elite 100 Mini Power Station - FoxRVTravel