How to tow a car behind an RV. Depending on your RV and how you RV, knowing how to tow a car behind your RV is a very important decision. If you pick a trailer then you know what you are going to tow. If you choose a motorhome then the question is how to tow a car behind an RV.
Everything a motorhome owner needs to know about how to tow a car behind an RV.
Almost all full-time RVers tow something. Part-time RVers usually tow something. Even most short vacationing RVers tow something. The only RVers that don’t tow anything have very small motorhomes. Our decision of what to tow was first followed quickly by how to tow it. If you have a trailer, you tow the trailer, the decision is finished. If you have a motorized RV then you usually tow a Jeep. Gradually I have seen that more of us tow a car.
Table of Contents
Should we get a trailer or a motorhome?
These decisions interlock. You need to carefully make these decisions. How to tow & what you tow is a question that quickly arises. This answer to this question had to be solved before we purchased a motorhome. RVs come in two basic varieties, trailers and fifth-wheels are towed, and motorized RVs tow cars. If you choose to tow a trailer or a fifth wheel then you will drive a truck, typically a large truck. Motorized RVs typically tow some kind of car.
Two engines?
Some people regard the second engine in a towed car as yet another engine that will need maintenance and use this fact as a reason that they want to tow their living space (RV) rather than having their living space tow a separate vehicle.
Someday we may change to a fifth wheel or maybe a trailer. I think the chances are remote but it could happen. If so, then we are talking about a full lifestyle change because it will involve trading both our house (RV) and our car.
If you have a trailer, then you are going to need a truck
Part of our decision to get a motor home was a decision to tow our car. Since our motorhome was gasoline powered we decided that we would tow a smaller car. (Sometimes tow cars are referred to as “toads”. I call my toad a mule but we can discuss that later.) Now we have a diesel motor home and can tow pretty much any size car. Had we chosen a towable RV (trailer or fifth-wheel) then the only choice would have been a truck. The bigger the towable RV, then the bigger the truck.

How often are you going to move?
We decided that on our journey that we would be travelers and that meant that we were going to tow something and take time every week to see new things. Some RVers don’t frequently travel. This makes a difference in RV selection. If most of your time is spent near one location a trailer or fifth wheel makes lots of sense. If you already have a big truck and especially if you don’t have a towable car, then a towable RV makes the decision easy.
What do you want to drive every day?
We chose a motorhome partly because if you choose a towable RV, then unless you chase, (chase is described below) then you are going to be sightseeing with a large truck. We didn’t really want to have our daily driver be a large truck. This is the primary reason we didn’t get a towable RV. A second reason is that a good towable RV and a big truck are about the same prices as a motorhome and a towable car.
Since we don’t tow a trailer or fifth-wheel and are nothing close to authorities on that subject we are going to leave you lacking information about that subject. After being on the road full-time for five years we have learned pretty much all about how to tow a car.
Tow or Chase
Some RVers choose to chase, (or follow) and drive in two vehicles. This is possible either with a truck/ trailer combination with a secondary vehicle or sometimes we have seen motorhomes that have a non-towable car. In these cases, you and your traveling partner(s) don’t get to drive together. I can’t imagine traveling large distances chasing– even though some people travel that way. We could travel in a chase / follow method because we don’t desire to travel long distances each time we move. We don’t travel this way because we want to be together.
What to tow; decision logic
A few times we have chosen not to drive together, the longest length was about 20 miles. One of the things we noticed was how quickly the car can maneuver compared to a motorhome. Because we were in San Diego, on the freeways we used the chase car to block traffic for the motorhome to aid in necessary lane changes. Since the motorhome is so much slower than any car, all we had to do was follow behind at the same speed as the motorhome. Then when the motorhome indicated a lane change, we changed lanes with the car first thus pre-occupying the new lane.
- We wanted to travel together.
- We didn’t want to sightsee in a big truck.
- Our daily driver had to be big enough to move our toys around.
- Our daily driver had to be small enough to be enjoyable and economical to drive.
For us, the answer for RV selection is a Motorhome
For us, the decision came down to a motorhome. We move frequently. We don’t desire to cover large distances every time we move. We don’t sit in one location for an extended period, followed by a large-distance move.
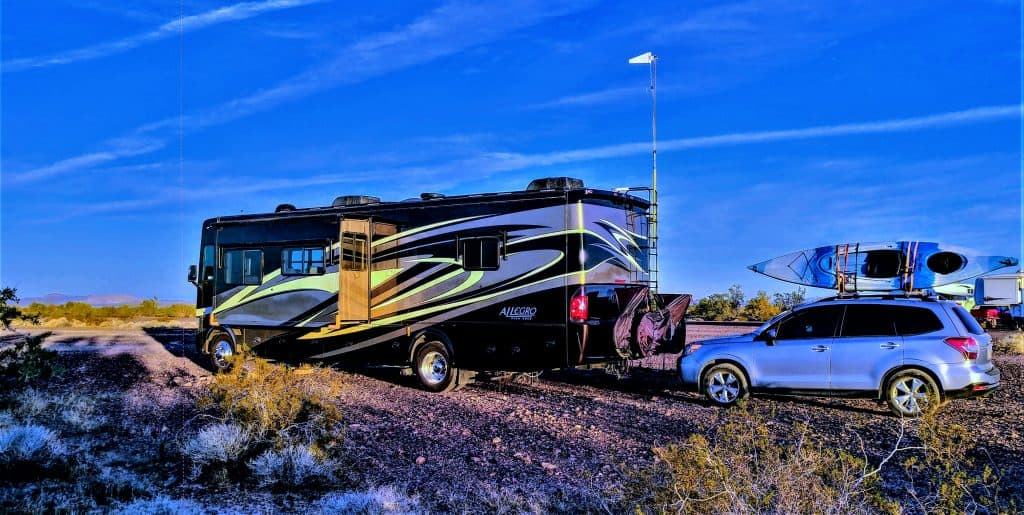
Our vision was to travel a few miles, say fifty to one hundred miles, and then stay for a few days and look around using our car. Then after staying a few days we have another moving day and repeat as necessary. For frequent moves, a motorhome has an advantage in set-up and tear-down, and parking. In these cases, motorhomes are easier and thus quicker to make camp. If you don’t frequently move then this advantage isn’t as important.
One thing that trailers have an advantage that we don’t have is that some fit into tighter spaces and thus they may not have to plan as far ahead or as carefully as we do. Even in our 40-foot RV, we can usually find a place where we want to go that has room for us, but we plan ahead.
Which car should we choose to tow?
Which car should we choose to tow was another decision. In 2017 we owned two non-towable cars. I say non-towable because to tow either one of these two cars we would have had to put them on a trailer or a dolly. (A dolly is a trailer with only front wheels, the front wheels of the car are parked on the dolly and the rear wheels remain on the ground.) Our first reaction was that we would get a dolly and just tow the car we already had.

Should we tow with a tow dolly?
A family member told us how bad a decision it would have been to go that direction including expressions in four-letter words. He said that we would regret the dolly for the entire time we owned it including when we were trying to get rid of it. I am going to make a recommendation. Don’t do it. You don’t want a dolly. If you tow a car, you want to tow it with all the wheels on the ground. Towing this way is sometimes called four-down.
The problem comes in about what to do with the dolly every time you take the vehicle off. Now you need parking for three vehicles. The cost associated with getting a four-down towable car ready to tow is similar to the cost of a dolly.

Should you tow your car on a trailer?
If you are taking your antique car to a show then this is the best way. The same goes for cars not licensed to drive on the roads. Maybe if you had an exotic car that you couldn’t bear seeing wet, then an enclosed trailer would be great. If you are towing a car for everyday use then everything that is bad about a tow dolly goes double for a trailer. If you are a traveler like we are, seeing the sites, then you want to tow your car with all the wheels on the ground (four down).

Towing “four down”
Since using a tow dolly would have been a mistake we needed a car that we could tow with all the wheels on the ground (four down). The two things that have to work correctly every time are that the transmission needs to be designed for recreational towing and the steering wheel needed to be unlocked so that the wheels steer while the car was being towed. In our cars, we needed to leave the keys in the ignition so that the steering wheel would not lock. I will cover the transmission topic later.
Picking a car to be towed behind an RV
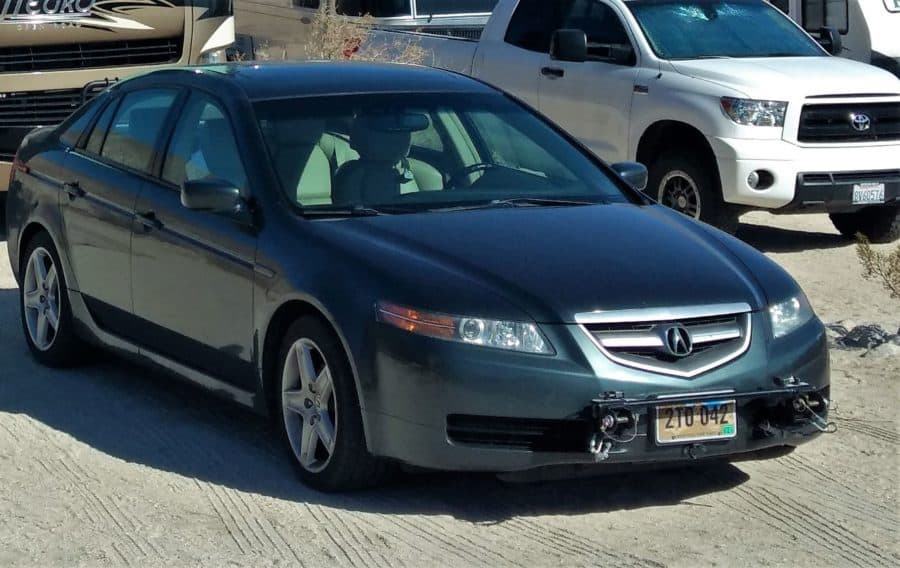
So, we went through an entire car change to a towable vehicle right from the start. Since we like nicer cars and I have issues with letting go of money without a fight, we picked an older Acura. The Acura we picked was already set up as a tow car. Even though it was older, it was a very nice car. Because it was a street, sport, luxury car, it was not a really good toad. When it was detached from the motorhome it was a really nice car.
Our first tow car with the snow plow attachment
While I owned the Acura, people would ask about the tow bar attachment on the front bumper. Since we were licensed in South Dakota I told them it was the snowplow attachment. Of course, it was a joke. People from real snow country knew right away that it was a joke. In Southern California, Arizona, and Las Vegas people assumed that it was the truth until I told them the real truth. I always let them in on the joke after telling it. It sure looked like a snowplow would fit the attachment points quite well.
I didn’t know I was buying a mule (our tow car)
One thing I didn’t know when buying our first toad was that I was buying a car to carry some of our stuff. When I chose my second tow car (mule), I didn’t get lucky — it was planned. We shopped for about three months before deciding. We already knew how to tow a car, what we needed was a mule.
We already had a towable toad so the mule would be a replacement. I wanted it to be ready to tow without changes. This means that it already had to have a Roadmaster baseplate installed. This is because we were going to tow it with a Roadmaster tow bar. Second, our Acura had an iron bar that lived in front of the front bumper and it wasn’t easy to remove. Our new mule had to have the option of quickly removable pins that would attach the tow bar to the baseplate. I was tired of hitting my shins on the baseplate when I walked by the car.

Our new toad is a good mule
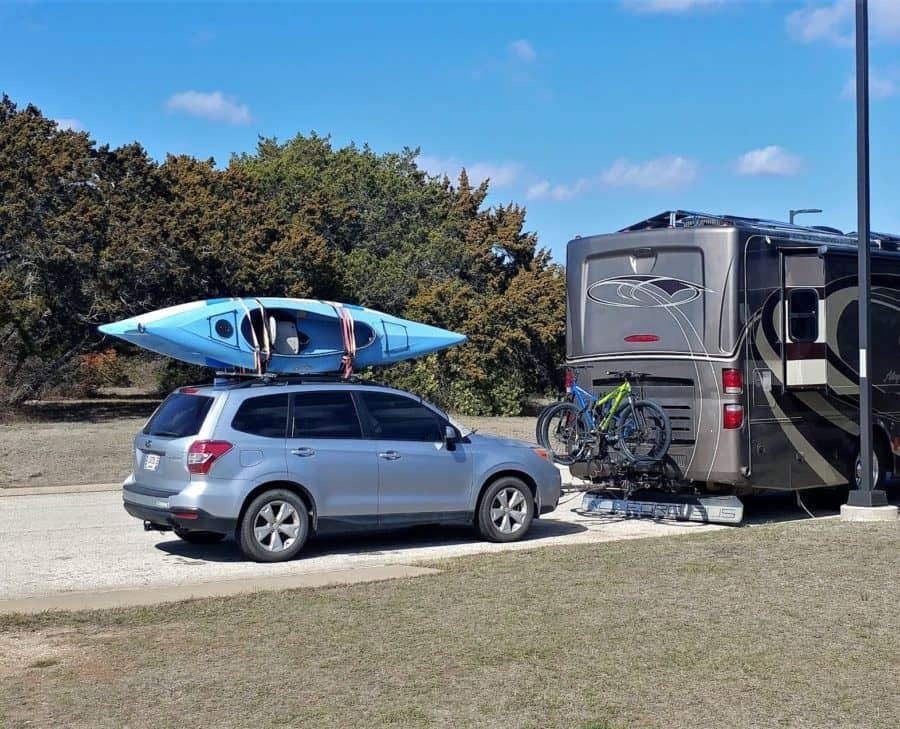
I mentioned that we had a new tow car. When I chose my mule, I didn’t get lucky — it was planned. Our criteria for a new tow car were that it had to have more ground clearance and be bigger than the Acura. It had to be big enough to carry two kayaks and it also had to be a good mule. The term mule refers to the fact that the tow car gets packed with stuff that we need to quickly access after our arrival at the campsite. Our mule carries the extra stuff we need at the campsite. Here is the story about getting our new toad, the mule. Our new Toad, the mule

How to tow the mule
We shopped for about three months before deciding which car to purchase. Since we already had a towable Acura so the mule would be a replacement and had to be ready to tow. This means that it already had to have a Roadmaster baseplate installed. This is because we were going to tow it with a Roadmaster tow bar. Second, our Acura had an iron bar (the snow plow attachment) that lived in front of the front bumper and it wasn’t easy to remove. Our new mule had to have the option of quickly removable pins that would attach the tow bar to the baseplate.
Transmission
The reason our previously owned cars were not towable is that the transmission would destroy itself. Our Acrua had a transmission that was towable. Our Subaru has a manual transmission. Most manual transmissions are towable. Many transmissions need constant lubrication even when the engine is not driving the wheels. The Acura had a transmission that didn’t have this problem. Most cars are not towable because of this transmission issue. The answer is you have to check each specific car and year to make sure the transmission allows for towing. Most cars that have a towable transmission have an available baseplate.
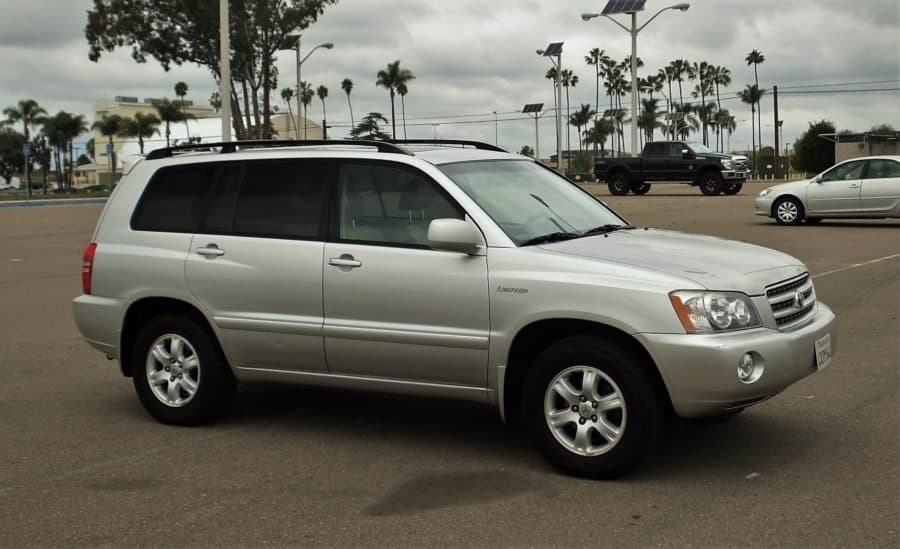
Which newer vehicles can you tow behind your RV?
These two guides list known towable vehicles. They have guidelines. The rule however is that you have to check your owner’s manual. Look for a section that says recreational towing.
To tow a car you are going to need a baseplate
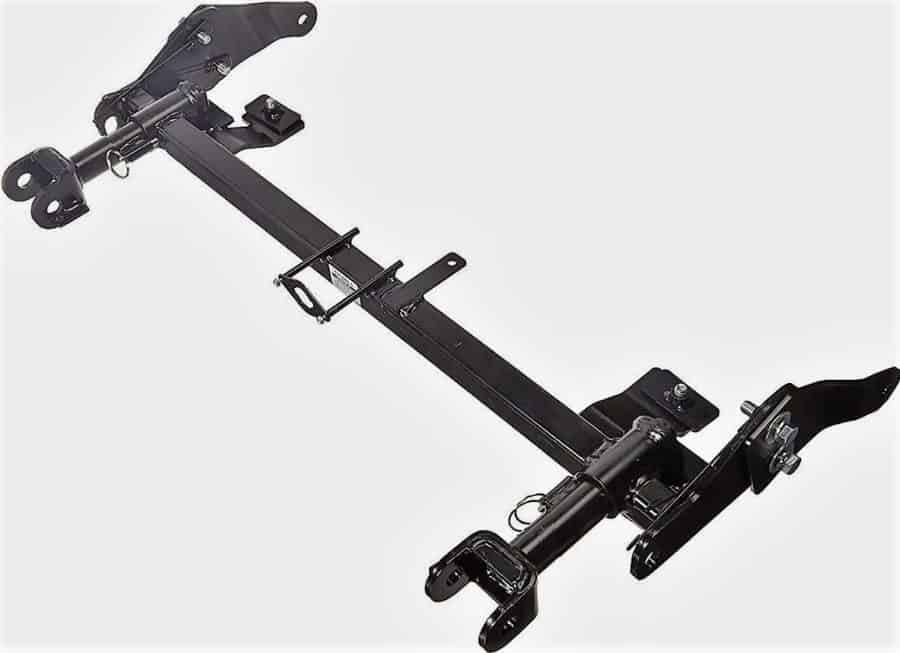
There are a couple of companies that make a baseplate for cars with known towable transmissions. Our Acura already came with a Roadmaster baseplate installed. The baseplate is an adapter that makes connection points for the tow bar (more later) to the car frame so that the motorhome can be attached to the tow car. The base plate is attached to the frame of the vehicle and you can think of it as an extension of the frame. Roadmaster Baseplate
Baseplate economics
Setting up a car with a baseplate is expensive. It would be a poor economical choice to put an expensive baseplate on an old car that had little life in it. Most of the time, if you sell a car, the baseplate will not add to the value of the car unless you are selling it to someone who wants to tow it behind an RV.
We were lucky to get a Roadmaster-equipped toad
When we first got our first toad, the Acura, it was already set up as an RV tow car. Since our baseplate was made by Roadmaster, then I purchased a Roadmaster tow bar. I didn’t know how lucky we were to get a Roadmaster. We are now on our second motorhome and second car, but we have only had one tow bar. I didn’t understand how lucky we were until we went to the FMCA rally at Coos Bay Oregon and after that visited the Roadmaster factory in Vancouver Washington. Here are links to the stories. Coos Bay & Mount Saint Helens
Changing the wiring to get the lights to work
Our Acura also already had the wiring installed to operate the lights from the motorhome. I didn’t have to make any changes to make the brake lights and turn signals work.

The good and not-so-good about towing behind our RV
Good, our tow car serves us well as both a mule and as a daily driver. Our kayaks live on top of our mule. Not as good: The only towable Subaru are the ones with manual transmissions and the smallest engines, (the base model). We also purchase the last available towable Subaru Forester. Years following 2016 dropped the towable manual transmission. Most Toyotas with automatic transmissions are not towable. Some older Hondas but not newer Hondas are towable. Some Ford and several GM cars are towable. Someday we may be getting a new more powerful bigger mule. Since we have a big diesel motorhome towing a bigger mule will be fine.

How to set up our tow bar
This is the picture of our Falcon All Terrain tow bar. The basic construction of the tow bar is stainless steel sliding arms inside a steel frame hooked to a pivoting hinge called a yoke. The tow bar can move up or down as the RV crosses bumps and hills.
The tow bar also pivots side to side allowing turning. It also will rotate to allow one of the car wheels to be above the other car wheel. The tow bar is attached to the car via the direct-connect pins or a crossbar. The older crossbar-style attachment was what I called my snowplow adapter. As soon as I could I replaced the crossbar with the direct-connect pins. Roadmaster Falcon All Terrain Tow Bar & Roadmaster Direct-Connect Pins

What braking system should I put in the car?
When we first started RVing we realized that we needed brakes in our tow car. This is called a supplemental braking system. It applies the brakes in the car to reduce stopping distance. I call this a brake-in-a-box. We used the same brake-in-a-box in both our Acura and our Subaru. You put the box on the floorboard between the seat and the pedal. The supplemental braking system is a very important decision when deciding how to tow a car behind an RV.
In a brake-in-a-box system, the actuator arm attaches to the brake pedal and as you stop the box notices the deceleration of the RV and applies the brakes in the car. The brakes rely on plugging into a 12-volt receptacle on the dash and inside the box is a small air pressure pump that pumps up an air chamber and then releases the air pressure to apply the brakes in the car. If the car were to detach from the RV, the break-away cable would then actuate the car brakes to make sure that it would stop moving.

The problem with the brake-in-a-box system is that you have to set it up every time before you tow the car and then test it. Then when you are not towing the car you need a place to stow it. It is not a bad system and but we wanted something easier, both easier to use and that took up less space when we were not using it.
I don’t know of any brake-in-a-box systems that use the power-assisted braking system on the car. This means that the actuator arm has to push the pedal very hard to activate the brakes. I can’t say that we ever had it adjusted correctly. What happened for us was that sometimes it didn’t apply the brakes and at other times it would skid the tires all the way to a stop.
This skidding sure got noticed by pedestrians when our car skidded to a stop behind the RV. It didn’t matter that we rolled up very slowly, it would frequently jam on the brakes as if it was trying to avoid a collision. I wonder if self-driving cars do this.
The very best supplemental braking system
We quit using our brake-in-a-box when we got our new Roadmaster InvisiBrake system. Now we no longer have to install and remove our tow car brake box and this makes getting ready to tow our car much easier than ever before.

The only thing that we have to do is plug our car into our RV and that is it. We had to do that anyway to get the lights on the car to work. Not only is the Roadmaster InvisiBrake system easy to use (I love things that require almost no effort) it takes up no room other than under the driver’s seat. Roadmaster InvisiBrake
Installed at the factory
Last fall when we went to Oregon we stopped at the Roadmaster factory to have our new Roadmaster InvisiBrake system installed. Unlike our old brake-in-a-box system, we always have the brakes installed and working every time we tow our car. And even though we can feel it working it has yet to skid our tires on the car when we apply our RV brakes.

Set it once and forget it
The Roadmaster InvisiBrake system has an adjustment knob so you can set your braking pressure (this was set during the installation) and we haven’t had to adjust it. The system also simulates your car’s vacuum system which allows your “power-assisted brake” system to work even though your engine is off. While the car is plugged in, the RV charges the car battery while being towed. This eliminates the dead battery in the tow car on arrival at a campground.

Uses the car brake system booster
Since the car braking system is activated it makes the very best use of the car braking system both during normal operation and if (hope this never happens) the car detaches from the RV while being towed.

Brakes are really important when towing your car
We know some RVers who had their car detach from their RV when towing. The unmanned tow car passed the RV before it came to a stop. Thankfully it only took out a road sign. Perhaps this was the first self-driving car. It crashed just like the new self-driving cars.
Law and liability
It is not only about the law, it is about liability. Supplemental braking systems are required in nearly every state and all Canadian Provinces. The only state that does not require supplemental braking (that I know about) is Missouri. Even so, if your tow car gets away, even in Missouri, you are liable for the damage it causes. Liability alone is the reason you should have one.
Roadmaster Falcon All Terrain tow bar
The connection between the car and the motor home is a tow bar. We chose the Roadmaster Falcon All Terrain tow bar. The Falcon All Terrain has several features that I really love. First, it is all steel construction. Second, it has cable guides for your safety cables. The release handles are easy to use and as indicated, the yoke means that it won’t bind despite how the car may not be level with the RV. Lastly, it stows compactly when not used.
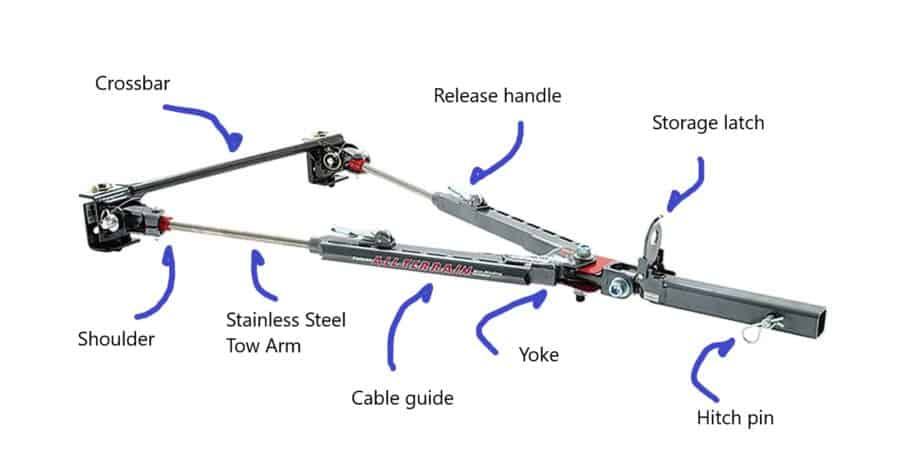
Set-up: Run the safety cables through the tow arm cable guides with the hooks on the car side and the loops on the RV side. Slide the 2-inch square tube into the receiver and secure it to the receiver with the hitch pin. Attach the safety cables to the receiver tube using the locking quick links. The safety cables must cross under the tow arm yoke to catch the tow arm in case of a break in the receiver or hitch pin. My pre-assembly also includes a double hitch, one to support the bicycles and the other for the tow bar. Taking a good tow bar picture on my RV is very difficult.
How to make sure everything is working correctly before you tow.
(I am writing this out partly so Tami can use this as a reference just in case she has to do it without my supervision. While I am hooking up the tow arm, Tami is installing the window cover on the car to prevent rocks kicked up by our RV from hitting our car.)
Get the car ready
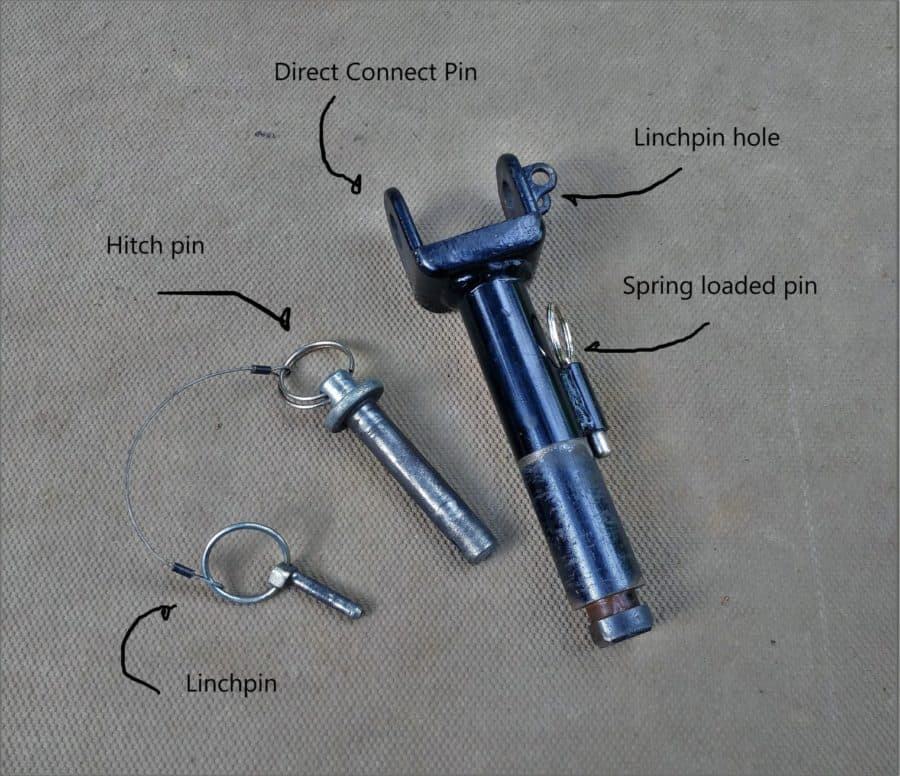
The first step is to place the direct-connect pins into the car. To insert the direct-connect pins you rotate the pin in your hand until the spring pin is at the bottom of the pin. Then you can insert it fully into the receiver tube. After fully inserted rotate the direct-connect pin so that the spring pin pops into the slot on the receiver tube. Done correctly, it will not come out without pulling the spring pin ring forward and rotating the pin 90 degrees, then pulling it forward out of the receiver tube.

Get the tow bar ready
The first step is to release the tow bar arms from the spring-loaded storage latch and lay them on the ground. To do this I extend the shoulders and stainless steel tow arms to full extension and support them with one hand and then move the stow release forward carefully so as not to allow the tow arms to twist or drop to the ground.
After they are released I then hold both shoulders, one in each hand, and lower the upper arm to level with the lower arm. Then walk around the back of the RV with one arm in each hand. Then spread the tow bar arms to create a triangle shape behind the RV. While spreading the arms to create the triangle, I also extend the stainless steel inner arms to full extension.
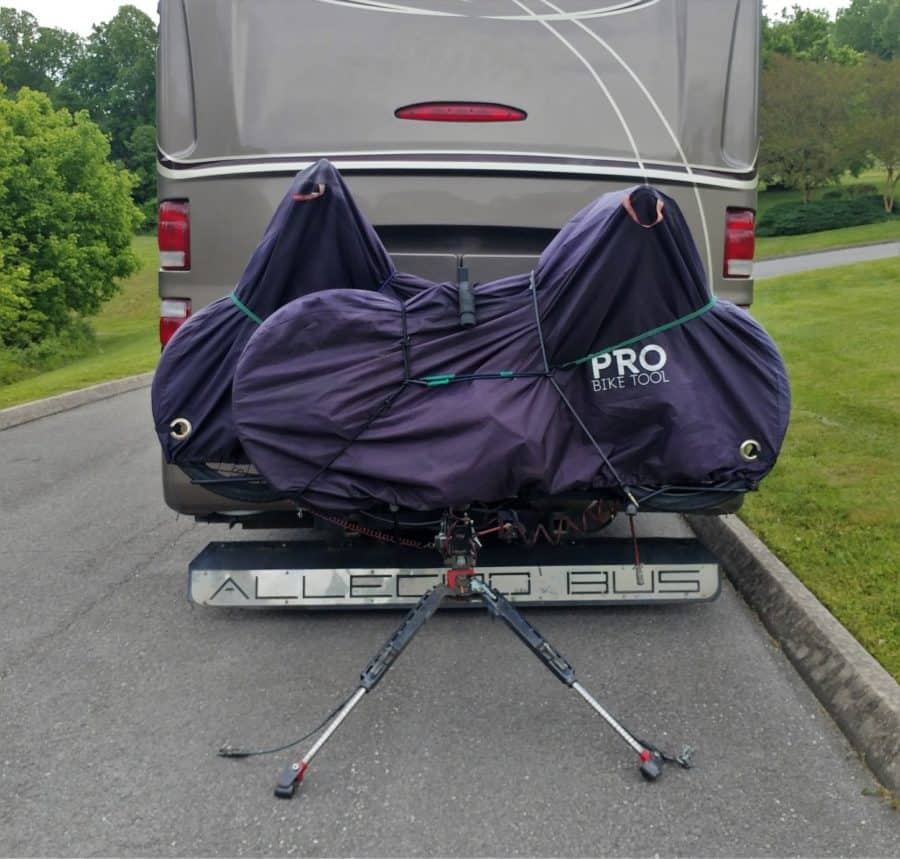
After that, park the car — engine off (*for our car with the key still in the ignition with the transmission in neutral and the parking brake on) — behind the RV. The position needs to be aligned with the RV direction of travel and close enough for the tow bar arms to reach the car, but not so close that when the stainless steel tow arms are retracted that they cannot attach to the direct-connect pins. (*For us, we leave the key in the ignition so that the steering wheel will not lock allowing the front wheels to turn while towing for you — refer to your owner’s manual).
Attach the car to the tow bar
Remove the linchpin from the direct-connect pin. Attach the tow bar arms to the direct-connect pins by first retracting the stainless steel section of the tow bar arms (as necessary) into the square tube. Then extend the shoulder to the direct-connect pin until it rests on top of the hitch pin. Adjust slightly as necessary and slide the hitch pin into the holes of the direct-connect pin and through the shoulder.

Install the linchpins and safety cables
Rotate the hitch pin so that the hole in the hitch pin lines up with the linchpin hole in the direct-connect pin. After that place, the linchpin is through the hole in the direct-connect pin and through the awaiting hole in the hitch pin. Rotate the linchpin ring to the locked position.


Attach the safety cables to the safety cable anchor holes on the baseplate and straighten the safety cables to prevent binding.
Install the breakaway cable and electrical cord.
Attach the breakaway cable to the break-away ring and the electrical cord to the electrical receptacle.

Our tow arm locking sequence
At this point, it would be safe to release the parking brake in the car, but we don’t do it that way. One person, (me) is always observing the next few steps while standing next to the car. Tami is driving the RV observing my hand signals to pause at the end of each step and to proceed to the following step. The following is the way we do it, not necessarily the way it has to be done, and includes extra steps to make sure everything is working properly.

How to check that the parking brake is not on, drag it forward
With the car parking brake still on, ever so slowly, inch the RV forward to lock at least one of the tow bar arms in the extended towing position. In the above picture, the passenger side tow arm will be the first to lock. When the tow bar arm locks (at least one) into the extended position, stop the RV.
Then I release the parking brake and again check the stick shift in the neutral position. Dragging it forward eliminates the initial lurch caused when you first get to full extension of the tow arm. Dragging it forward also prevents the car, with the parking brake on from rolling forward towards the RV compressing the tow arms. Once at least one of the tow arms is locked the car will not move forward compressing the tow arms.
How to check the steering wheel unlocked, make “S” turns
To lock the other tow arm in the fully extended position, drive the RV forward making “S” shaped turns. This turning allows for the other tow bar arm to lock into the towing position and it allows the observer to see if the steering wheel is unlocked and rotating.
About tail swing. The tail of the RV swings in the opposite direction of the turn. In a left turn, the tail will swing to the right. Use this knowledge of tail swing to direct the driver to make a turn to lock the tow arm.
Check the lights
After checking the car parking brake off, the transmission in neutral, and the tow arms locked we then always check both turn signals and brake lights as the last step of our towing departure sequence — every time we tow. After checking the lights I enter the RV, lock the door, wash my hands and we are ready to go.
Hooking up and departure checklist
This checklist assumes two people performing the task of hooking up the car and checking to make sure everything is working correctly.
- Attach the direct-connect pins to the baseplate on the car
- Spread the tow arms behind the RV
- Position the car behind the RV centered on the tow bar close enough so that the tow arms can reach the direct-connect pins and attach the tow bar shoulders to the direct-connect pins.
- Install the linchpins, safety cables, breakaway cables, and electrical cable to the car.
- Move the RV slightly forward to lock the tow arms in the extended position.
- Release the car parking brake, and check the engine off.
- Move the RV forward with a turn to observe the steering wheel movement.
- Apply the left and right turn signals to check the correct operation on the RV and car.
- Apply the brakes on the RV to ensure the correct brake lights are operating correctly on the RV and the car.

Our arrival sequence
Unless you have a pull-through campsite you will need to unhook the car before getting to your campsite. This won’t take long to describe. Here are the critical steps. Apply the parking brake on the toad and disconnect the tow bar.
How to release the stainless steel tow bar arms
The operation of the tow arms requires using the release lever located at the end of the steel square tube. You will use this lever anytime you want to retract the stainless steel extension bar from the fully locked position. To use the lever you must push the stainless steel arm slightly into the square tube while moving the lever. Operation of the lever will only release the stainless steel tow arm when there is a slight pressure toward the square tube. If the release lever is not easy to operate don’t force it. There is a much better way.
Releasing under load is not possible due to tension on the release mechanism. If it will not release then try to release the other side first. (Occasionally, especially if the RV is going uphill, Tami will need to drive the car forward slightly to allow the release handle to function.) Then release the tension on the tow arm by moving the release handle forward. (Remember the release handle only works when there is only a little forward force on the release mechanism. The weight of the car cannot pull back on the release mechanism when trying to release the tension.)
After releasing remove the linchpin and hitch pin and lower the shoulder to the ground. Remove and stow the electrical cable and breakaway cable. Remove and store the direct-connect pins. After the toad is not connected to the tow bar, back the toad away about two feet (or just go park the car) and stow the tow bar.
Stowing the tow bar
It took me about half a year of full-time RVing before is found a good method to stow the tow bar. The first step is to with the tow arms fully extended and place the tow arms directly behind the RV. Then by grabbing the shoulders slightly tilt the tow arms. (I always stow the tow bar to the driver’s side so I always tilt it to the passenger-side tow arm slightly lower than the driver’s side.)

With the aft tow bar in the slightly lower position walk towards the storage side. After you are at the ninety-degree position then you can tilt the yoke towards the storage release lever. This will mean that the aft tow arm, which was slightly lower, will rotate to the top position.
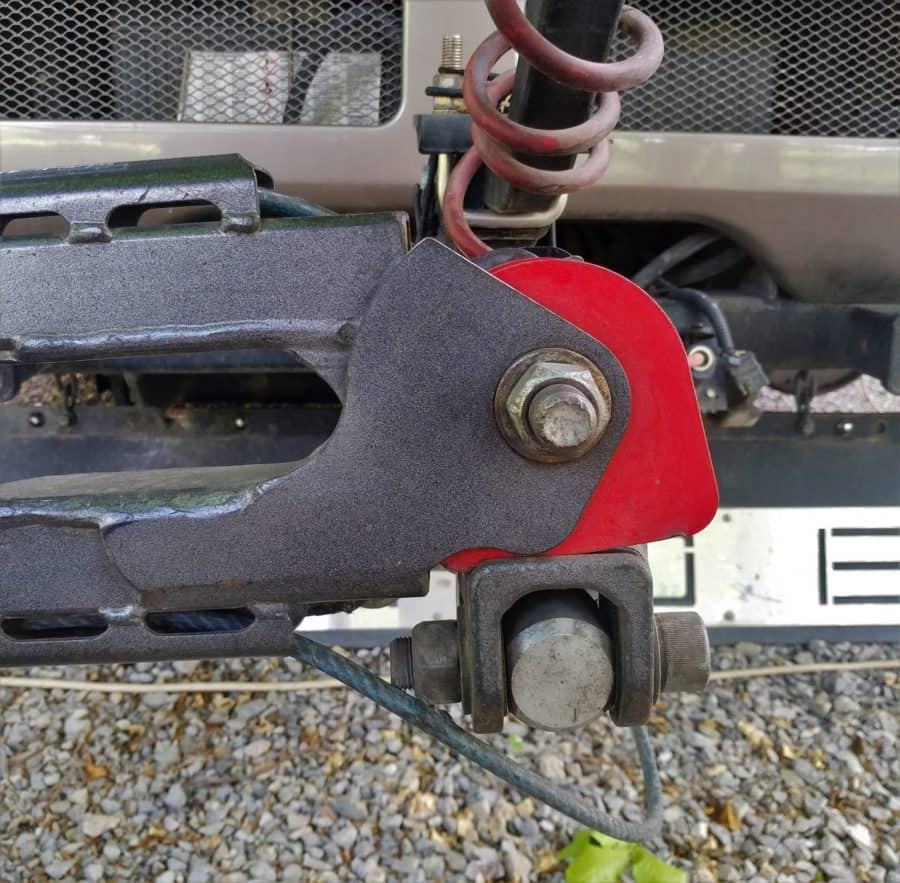
As you arrive at the top position the bolt head will then enter the storage latch and you can compress the stainless steel tow arms into the square tubes.

Store the safety cables by attaching the hooks to the safety cable at the yoke and cover the tow arm to keep the weather off of it.
Detaching checklist
- Set the parking brake on the car to prevent it from moving while unhooking the tow bar.
- Detach the safety cables, electrical cable, and breakaway cable.
- Move the release lever forward to remove tension from the release mechanism.
- Remove the linchpins, and hitch pins. Place the shoulder assemblies on the ground.
- Back the car up (at least two feet), and remove and stow the direct-connect pins.
- Stow the tow bar, safety cables, electrical cable, and breakaway cable.
How to avoid critical mistakes when towing
Driving the RV with the tow car is nearly identical to driving without the tow car. One thing you need to remember is that you are now longer than before and for lane changes, you need to pull far enough ahead to have room for the RV and the car.
One of the things we have is a full-time rear camera and we can watch our tow car pass the vehicle we are passing thus making sure we have ample room to enter the lane. Another use of our rearview camera is to check that our tow car is centered following us down the middle of the lane. It is easier to see that we are centered in our travel lane by looking at the toad than it is by looking out the front window.
Never back up with the car attached
It would not be a full discussion if I didn’t mention that RVs with toads cannot back up. This is because the steering wheel on the toad is free to turn with the front wheels of the car. In our last four years, we have un-hooked our toad about five times because we couldn’t make a full U-turn and backed up about two feet total.
Please subscribe and join us on our journey
We will add you to our email list and send you updates about once a week. Here is a link. Subscribe
About our links
As you know, our blog income is zero – this allows us to be independent and just tell the truth. We do not get income or commissions. No, we don’t make paid endorsements. We don’t make recommendations but instead, we will tell you what we like (or dislike). The links are only provided as a quick reference to help our readers.
Links
Roadmaster Falcon All Terrain Tow Bar

WOW. Thanks!
Man, the hours you put into logging all this helpful and useable information.
This post is definitely a keeper!
Nicely done article! Totally agree with all your findings! We tow a 2014 Honda CRV (4 down) behind our Allegro Breeze motor home.
Good article I love my Invisibrake.
This is good stuff. I love the drag it forward step in your checklist. I have a friend (who I sleep with) who didn’t release the parking brake when towing. It was only about ten miles. We had to completely rebuild the brakes on the car and replace the tires.
Great article. Especially concerning the braking system. Not knowing any better, as newbies, we had an RV company install a ‘braking system’ in our tow car. When we picked up the car were astounded to see a monstrous ‘brake-in-a-box” in front of the driver’s seat. We had them take it out, but they wouldn’t refund the $2000 we had been charged.
We had a “Stay and Play” system installed, which, like the InvisaBrake, needs no setup except to hook up the main power to the toad. I can’t imagine anyone installing a ‘brake-in-a-box’ on purpose!
(biased remark removed) Demco and Blue Ox also make quality towing products. Let’s be fair now.
As I explained. We got our cars already set up and they had Roadmaster base plates. So I got a used Roadmaster tow bar so that they would match. Then in Coos Bay at a rally Roadmaster fixed my tow bar with free labor. I paid for new replacement parts. I was impressed and grateful. Pretty good for a second owner of a used tow bar with an unknown number of miles.
During our first visit to Roadmaster in Vancouver, they inspected my car and fixed the wiring on the motorhome. I wish they could have fixed it at the rally but the car and motorhome were not in the same spot. Great service for something I couldn’t figure out. They went straight to the problem. Ten minutes later I had a new wiring harness and fixed it at a very low service fee. Again they inspected my tow bar including taking it apart and cleaning it. This time we didn’t need any replacement parts. I think I was out less than one hundred dollars for both the motorhome wiring and tow bar disassembly and cleaning. I again used my credit card. I think I paid for a fraction of an hour of labor. I was grateful not to be charged for even an hour of labor.
I used a brake in a box until that failed. So I got an Invisibrake and had it installed at Roadmaster. Then I used my credit card again. Again they inspected my tow bar and it was still fine even though we put more than twenty thousand miles on it. Again I was very impressed.
I didn’t compare to Demco and Blue Ox because everything in the blog is about our experience. I don’t have any experience with Demco or Blue Ox. A good friend has a Blue Ox and seems happy. If you have a Demco or Blue Ox setup for your tow car, I hope that they are as good as my Roadmaster setup has been for me.
I’ve towed a front-wheel drive car on a tow dolly for 15 years behind my motorhome and I don’t regret it. I’ve towed 4 different cars behind 2 different motorhomes and saved thousands of $$. No base plate mounting purchased on 4 different cars no expensive braking system (I use the same brake controller $89 ) car is easy to load and I push the tongue of the tow dolly under the motorhome all the way up to the fenders leaving about 3 feet hanging out. If your campsite is so small you don’t have 3 feet from end to end you have a very small site that the front & rear bumper of your motor home is on the road and when in a tight spot such as a gas station I can back up the car and tow dolly , you can’t do that flat towing
If car makers keep going the way they have been… Bill, you may have the only answer. The number of towable cars has decreased every year for at least the last ten years.
Sometimes our campsites are so small that we have to park with the rear of the RV in the bushes at the back and with our tow car parked somewhere else. Kaloch Beach in Olympic National Park last fall has a great picture of our car, and the ocean both taken from inside our RV.
It was a real challenge to get our RV into the site and there was no room for a dolly or our car. Here is a link to that story.
https://foxrvtravel.com/kalaloch-beach/