RV Solar Series: How to Design a Just – Right – System. A just-right size, not too small, not too costly. Sounds like Goldilocks. Just right.
Start with simple and work to more complex.
Start with a battery. Add to that a positive and negative wire that leads to a small solar collector. Connect them together and bingo, you have a functional solar electric battery charger. It really is that simple.

Bigger becomes more complex
Bigger becomes more complex but not much more complex. With this simple design, it is important that the panel size is small. (20 watts or so.) This is so that the amount of electricity delivered to the battery will not overwhelm the battery and cause damage. Such a small panel could be called a battery maintainer or trickle charge. The only concern is that the output of the panel in terms of volts needs to be slightly greater than the nominal voltage of the battery. This is because the energy from the panel will maintain the charge on the battery.
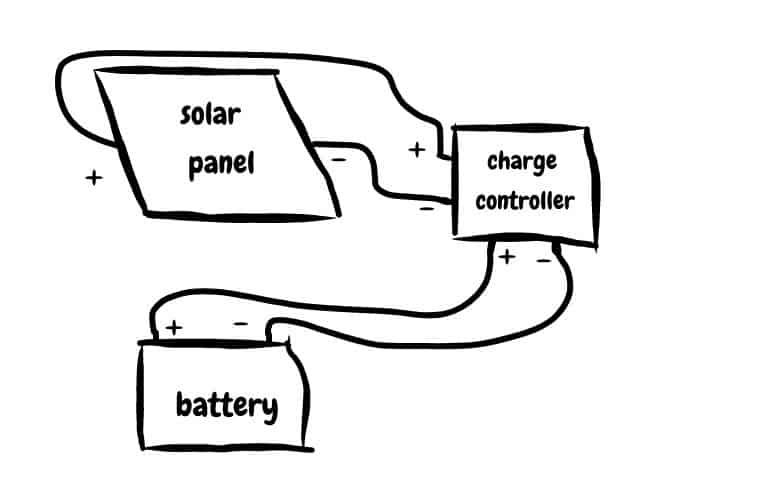
Ok now a little more complex
Ok now a little more complex, between the panel and the battery, place a solar charge controller. A charge controller will decide when to charge the battery. This will allow for a larger panel that could damage the battery if left unmonitored. Since watching a battery charge is much like watching a snail, the charge controller will allow you to do other things. Snail watching is the charge controller’s job. This will allow you to recharge the battery faster.
The way this works is you have a solar panel that can deliver more amperage than the battery wants when it is close to full. The charger controller tapers off the charge after the battery is close to full. These charging parameters are called by different names. The most common names are bulk (when batteries are really hungry). Absorb (keep feeding it because we know better than you). And float (charge a little at a time so that we don’t overfeed). When the charger is in bulk or absorb, most of the potential energy is delivered to the battery. When the charger is in float, most of the potential energy is refused and wasted.
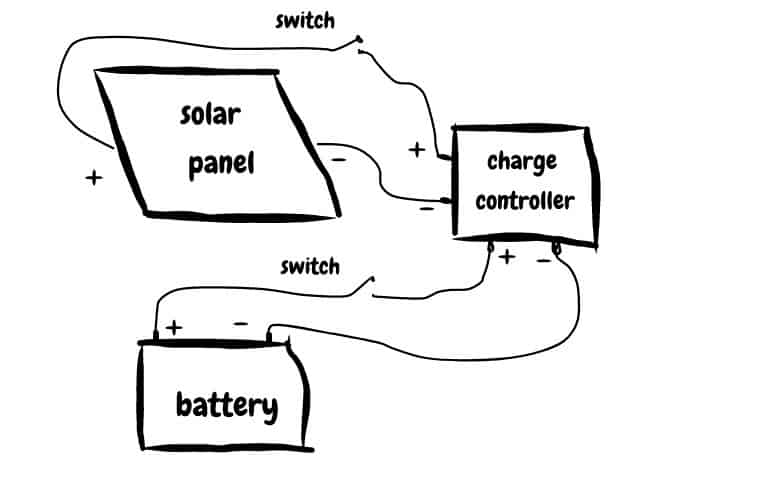
Next even little more complex
Next even a little more complex, you would want a way to turn off charging manually. This is accomplished by two switches, one located between the battery and the charge controller and the other between the panels and the charge controller. These switches can be standalone or sometimes are built into circuit breakers. Circuit breakers are nothing more than a switch that can be positioned manually or will open the circuit if too many amps are present. Fuses are just like circuit breakers except when they burn out they need to be replaced. I used a circuit breaker between the charge controller and the battery and switch plus a fuse between the panels and the controller. One could argue that the circuit breakers are unnecessary, but switches are necessary.
Switches are necessary
Switches are necessary because of the need for occasionally disconnecting the panels from the charge controller manually so that maintenance can be performed. Always connect the battery to the charge controller before connecting the panels to the charge controller. Doing the opposite has the ability to destroy your charge controller. Always switch off the panels before making any changes to the charge controller or the battery. Always switch off the panels before disconnecting the battery, such as when you want to replace your battery.
RV Solar Series: How to Design a Just – Right – System: Now the question becomes how big?
Make sure your charge controller is big enough to take all the output from your panels. I typically have 70-80 volts from the panels to the charge controller. I have up to 50 amps (not even close) from the charge controller to the battery. Inside the charge controller, the voltage is reduced to the voltage the battery wants. Since I have an MPPT charge controller extra voltage is converted to more amperage to increase the rate of charge. Current from the panels to the charge controller is low because the voltage is high. Because the voltage from the panels is high, and the amperage is low, I can operate on smaller wires for longer runs. Because the amperage is high from the controller to the battery, I need bigger wire and short runs to keep the efficiency during recharge high.
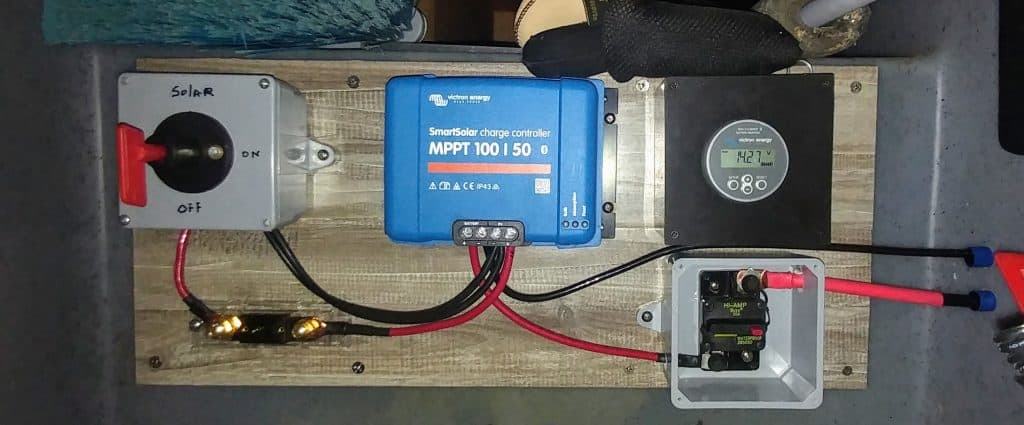
This is a picture of my charge controller, battery monitor, switch and circuit breaker. What you cannot see is that four wires enter the switch on the left and are combined on the positive side leading to the fuse. Notice the difference between the wire sizes leading to the right of the circuit breaker going to my battery compared to the wire size from the switch to the charge controller.
Too small wires cause voltage drops in the wires and heat buildup in the wires leading to a failure (melting). Too big a wire is wasteful of dollars and unnecessary. I have two sets of 10 gauge wires from the panels to the controller for only one reason – if I expand my panels — I already ran the wire. Running the wire was the most difficult item in the process. I put all the wires to use, even though I didn’t need that much capacity. (note all terminals are covered when finished and not exposed. If they were covered, the picture would be harder to explain)
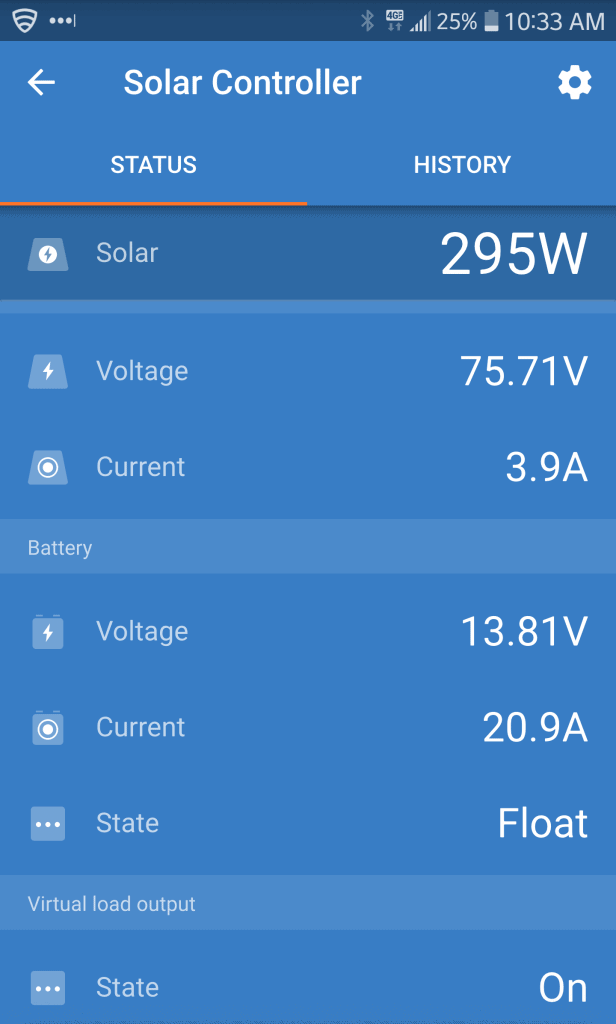
Bluetooth
My charge controller also sends information on operations to my phone via Bluetooth. As you can see, my 700 watts of solar is producing 295 watts of “useful energy.” The wire coming from the roof is carrying 75.71 volts but only 3.9 amps. This combination of higher volts on long wire runs allows for very little loss due to voltage drop in the wire.
The reason my 700 watts of solar is only producing 295 watts of “used energy” is because my battery is nearly full as indicated by the float stage. Inside the controller, the 75.71 volts are converted to 13.81 volts and 20.9 amps. This is why the wires between the controller and the battery need to be large, and short. Soon after this picture, my batteries reached full and the production decreased to a very low amperage. One of the ways you can tell that a lead-acid battery is nearly full is that the amperage from the charge controller drops to approximately 0.5 amps per 100 amp/hr of battery size.

History
This is a history page from my controller. Notice that the first two columns have nearly no solar production, this is because my batteries were already full. The only contribution to my energy needs was the solar panels were shading my roof. The column titled 6 days ago, was very interesting. That day I made 1.57-kilowatt-hours of energy and my maximum production was 601 watts.
Panels are working great
This tells me that my 700-watt panels are working great. 7 days ago, I made nearly the same amount of energy 1.32kwh, but the maximum was 285 watts. The difference was all because of my battery state of charge and sun angle. On day 6, I had a very low state of charge and the sun didn’t hit the panels until nearly noon. This sets up a situation of lots of available energy and a very hungry battery. On day 7, less direct sun hit the panels’ early in the morning. The battery was fuller before maximum potential energy hit the panels.
Balance
Balance your system and plan for expansion in the future. It was silly to put more panels on my system than my battery needed, but I did it in the name of expansion. My panels were used panels and they probably put out about 90% of a new panel. I purchased them for half price when I expand I probably will get used panels again. I ran twice the wire to make expansion easy and I didn’t change my battery. My charge controller was big enough for my panels.
Don’t undersize your charge controller, make sure it matches our panels. Charge controllers are expensive, in fact, the most expensive part of our system. Plus depending on my future decisions my charge controller may handle double the number of panels. (would require a switch to a 24-volt battery bank) Do not buy a poorly made charge controller, you will only end up buying another one down the road when it fails or isn’t big enough for future expansion.
RV Solar Series: How to Design a Just-Right – System answers lots of questions. If you have more questions don’t leave them unanswered. Just drop me an email with a comment.
Please subscribe and join us on our journey
We will add you to our email list and send you updates about once a week. Here is a link. Subscribe
About our links
As you know, our blog income is zero – this allows us to be independent and just tell the truth. We do not get income or commissions. No, we don’t make paid endorsements. We don’t make recommendations but instead, we will tell you what we like (or dislike). The links are only provided as a quick reference to help our readers.

